Creating an accessible EPUB
How to create an accessible EPUB
Introduction
Creating an accessible EPUB involves a number of steps that can vary slightly depending on the type of content authoring tools being used, and the features you want to include. In this guide we will look at the more commonly utilized techniques for authoring accessible EPUBs and provide links to resources and guides you may refer to when putting together your book.
At the bottom of the page, we have included references for other resources you can use when building accessible EPUBs.
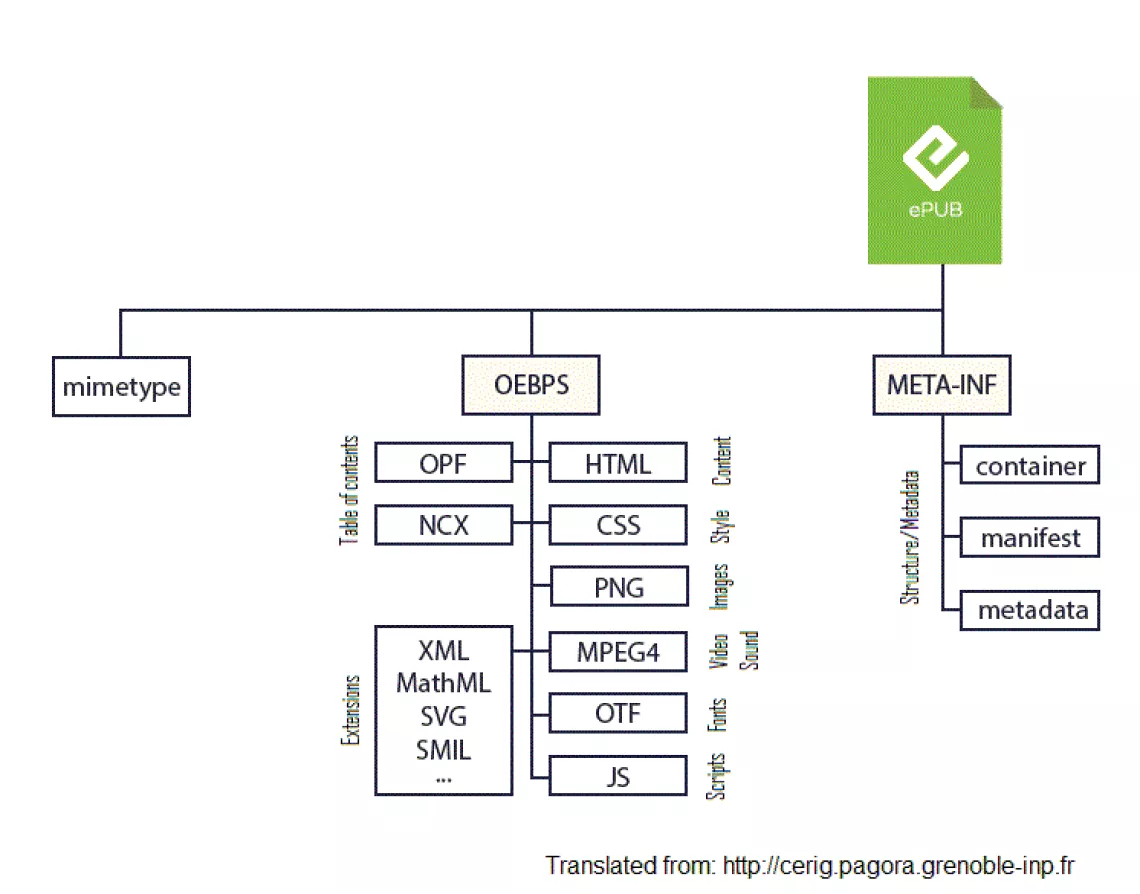
Understanding the EPUB structure.
A knowledge of the structure and standards for EPUBs is necessary to complete the process of adapting your content to an accessible ePub. Many of the authoring tools that produce EPUBs require further editing after export to make the EPUB fully accessible. Read about the anatomy of an EPUB and learn the internal structure.
Click here to read EDR lab’s anatomy of an EPUB
Step 1: Setting up
To author an accessible EPUB there are many software and tools available both free, open source and paid for every step in the process from pre-production to digitization to content authoring, accessibility authoring, packaging and validation. The software and tools you use will depend on the type of content being authored, access to resources, technical skills and the desired output.
For example, some EPUB authoring platforms will prioritize simplicity over versatility, while others may require detailed knowledge of HTML or CSS or cater to specialized elements such as interactivity or accessibility.
Click here to learn about software and tools to use.
Step 2: Defining the content adaptations
When producing an accessible EPUB from your content. It is important to think about the ways that content may be adapted to make best use of the accessible format and modifying the traditional ways text and exercises are presented so that they are accessible to persons of different types of disabilities and learning styles.
It is essential in this process to involve persons with disabilities or DPOs (Disabled Persons Organizations) to better adapt content so it fulfills the needs of actual users with disabilities.
Click here to learn about applying UDL principles for content adaptations.
Step 3: Digitizing and converting
When preparing your content for conversion to EPUB it is often necessary to digitize your content in a case where the piece of content may be a printed book or a PDF. In this case there are processes and tools you may use to capture your printed material and convert it to digital assets which you may then embed in the EPUB.
We recommend using a flatbed scanner to capture the pages in 300dpi to preserve the quality and integrity of the images. The higher the quality of the scan, the better the quality of the finished product. In the case where you do not have access to a flatbed scanner, you may use a smartphone camera to capture the content. Ensure you are in an evenly lit room and there is no glare on the page and the camera is able to take high quality photos.
After scanning the content, you will need to capture the text on the page - in most cases this involves recreating the text using a word processor like Microsoft Word.
In the cases where you are given a PDF of the book, it is important to check if it is simply a scan saved as a PDF or a digital version of the book where you are able to extract text and images. The latter involves selecting the text using Adobe Acrobat or a similar PDF editing tool and exporting the image content out of Acrobat. Click on "Tools" then "Export PDF” in the Export PDF tool, choose "Image" and then check the "Export All Images" box. When you click "Export" all the images will be exported into a folder of your choosing.
All images saved from the export should be placed in a folder called “images” that will form a part of the main structure of the EPUB file. Use an understandable naming convention as you will need to match the images to image descriptions.
There may be formatting issues in the text and export issues in the images when exporting from Adobe Acrobat, make sure you check the text for any inconsistencies and the images for complete material. If there are superfluous design elements that are difficult to recreate in the EPUB you may use your judgement to omit them from the last version.
Step 4: Setting up template/generate from authoring tool
In the earlier sections we touched upon the structure of an EPUB. If you feel comfortable working with that structure, there are templates available online that you may download as a starting point for your accessible EPUB.
Click here to download ePub templates
Click here to download the eKitabu ePub template
If you do not feel comfortable working with the code in this way you may prefer to start with an authoring tool that generates an EPUB package. However authoring tools must be used with the knowledge that they are likely to generate a lot of superfluous code in the EPUB package and will take longer to convert the publication to an accessible publication.
Click here to view our list of authoring tools
Step 5: Authoring
Now you are set up and ready to create your accessible EPUB. Use one of the authoring tools or editing tools suggested (i.e. Sigil, Calibre, or Sublime Text). These authoring process are suitable for re-flowable publications where the majority of text and headings are left aligned, and images and videos are embedded inline within the flow.
Step 6: Adding standard accessibility
Once the content has been authored, use the chosen authoring tool or code editor to add the following required accessibility features:
- Add metadata info to the head of the file to indicate the publication is accessible and features the following accessibility components. Examples of metadata include:
- dc:title - title of the publication
- dc: language - language used in the publication
- dcterms:modified - date when the publication's content was last edited
- dc:creator - author credited with the EPUB
- dc:publisher - publishing organization of the EPUB
- dc:date - date of the EPUB's creation
- Add “Alt Text” descriptions for images so they may be read aloud be a screen reader.
- To read about best practices in creating image descriptions visit the diagram center.
- Avoid images with text embedded - if necessary ensure the image description describes all the text in the image.
- Use the POET training tool to better plan how you will name your images.
- Prepare the all image descriptions using a spreadsheet and a naming convention to match the image files.
- If your authoring tool does not support adding image descriptions, you will need to paste them in to the <"alt=”> tag inside of each image file in the html of your content.
- Add navigation by editing the OPF (Packaging document) manifest and spine.
- The manifest is an unordered list of all files within the ePub directory. Each item in the manifest as an ID that describes the file, a reference to the actual file name itself, and the type of media such as font, image, audio, video, XMTL or CSS file.
- The spine is the backbone of the ePub from which the eRead identifies the reading order of all the contents of the manifest. The spine can also include non-linear items that are not displayed in the normal flow but are reached from other spine items (i.e. pop-ups).
- Add semantic HTML markups to the EPUB's content. Semantic HTML markups are identifiers for discrete sections of text and can include <section> code for chapters or <aside> code for sidebars.
- Embed accessible fonts in the EPUB. Multiple fonts can be embedded in a single EPUB file in order to ensure that users with different needs can select a font that meets their requirements. Examples are fonts for dyslexic users such as OpenDyslexic.
Step 7: Enhancing accessibility
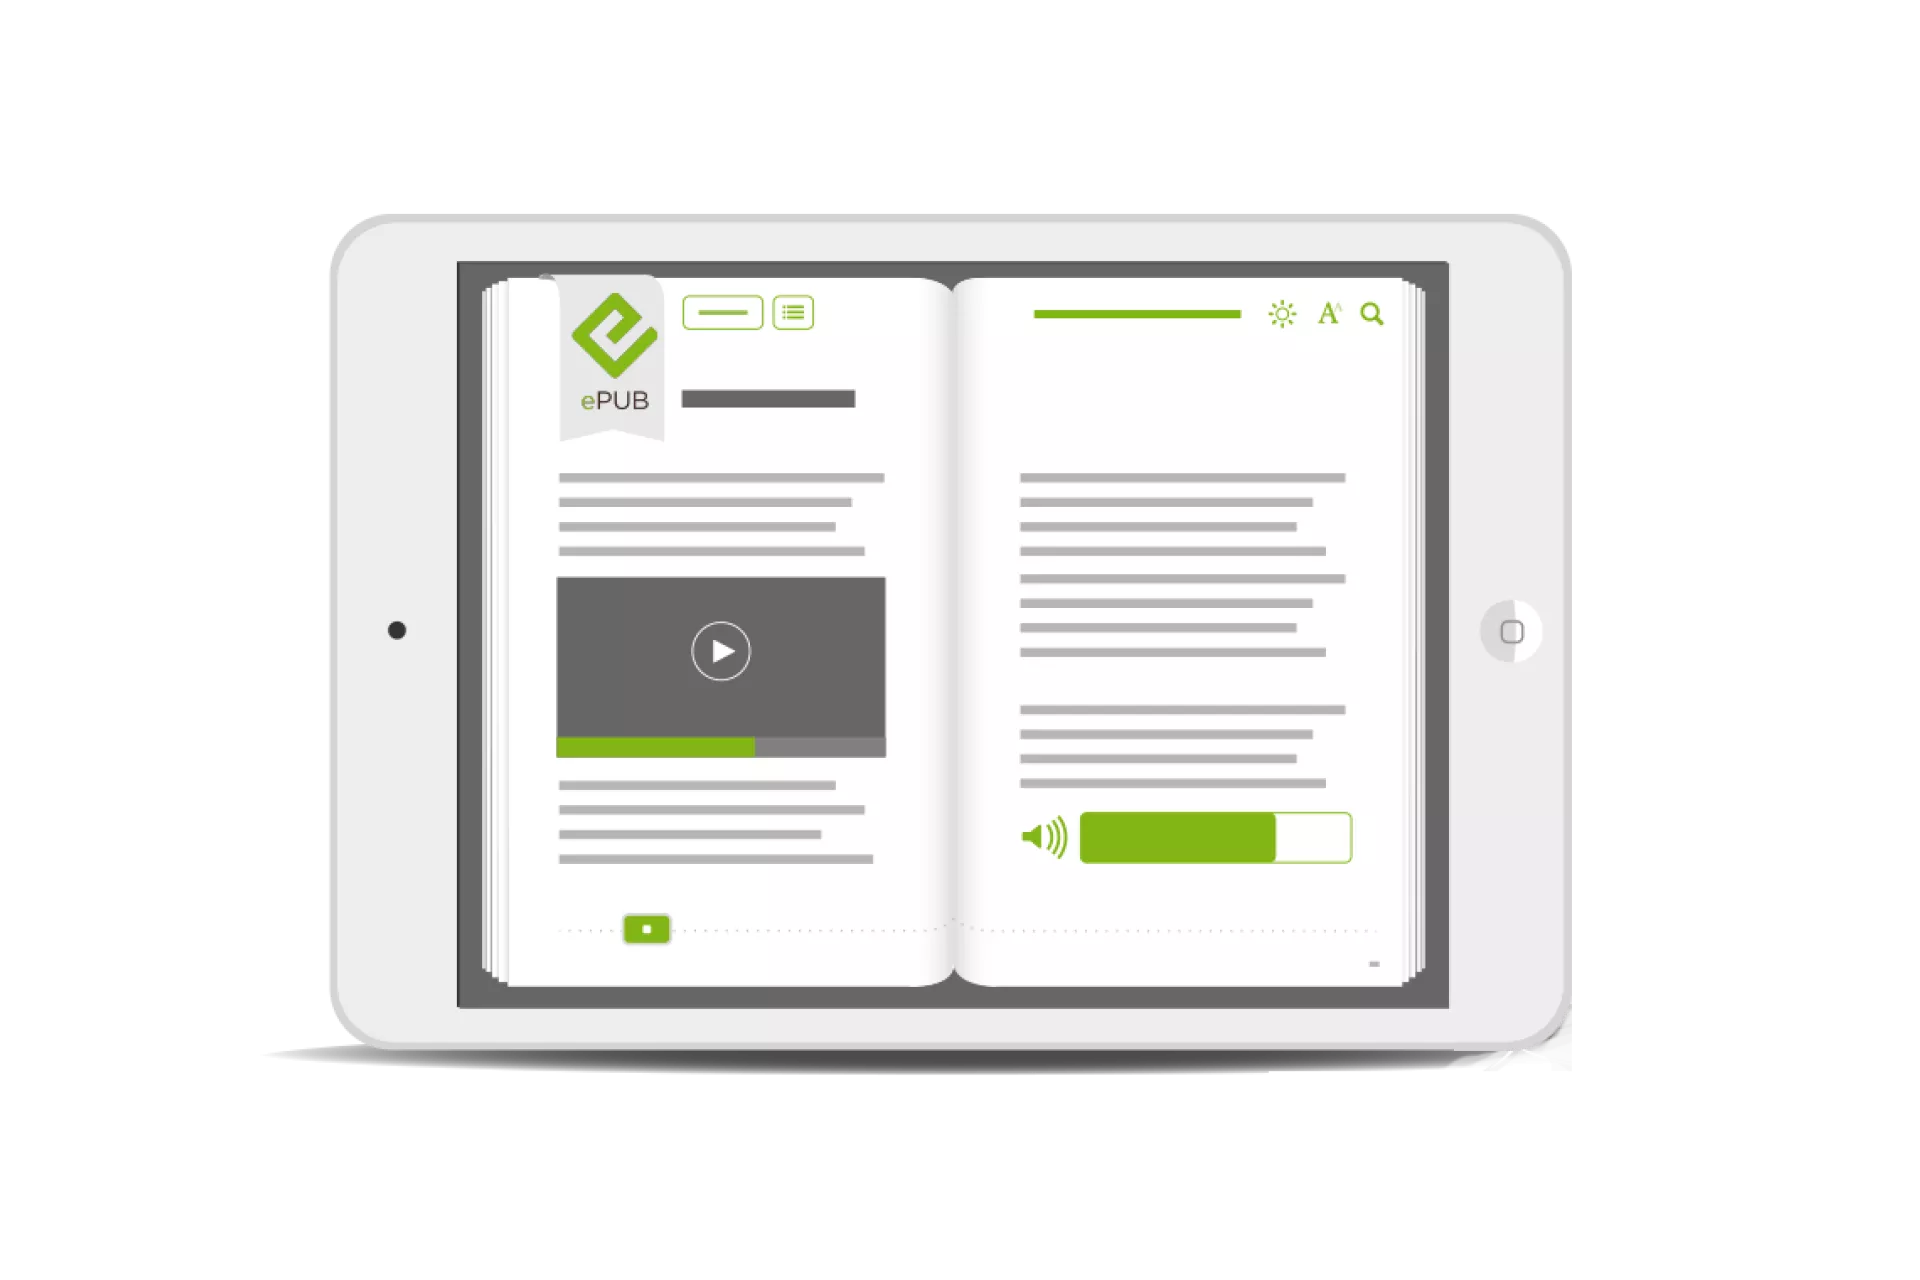
Adding media overlays
It is possible to synchronize voice-over narration with text and highlights as part of the accessibility enhancement. This is accomplished through a technique called “Media Overlays” where an audio file of the text recorded with a human narrator or a synthesized voice (generally text-to-speech engine) is synchronized with written text by saving the time codes and durations for each phrase that is synchronized in an SMIL file (a type of XML file format). The id tags in the SMIL file corresponding to each audio segment is referenced in the XHTML files for the ePub corresponding to the phrases/sentences to ensure they are synchronized correctly.
Click here to read the Media Overlay specification
Creating and adding media-overlays to your book can be a time consuming manual process. You will need a basic understanding of EPUB structure, how to modify XML files and a basic audio editor. A great free tool for this is Audacity.
Click here to see how Media Overlays can be added to your book
An easier, more automated approach exists in a number of authoring tools available in the market.
An open source tool that will allow you to add Media Overlay's to a basic EPUB (text and images only) is TOBI available here on the DAISY consortium site. Here is a short tutorial on how to use TOBI to add media overlays to your book.
Click here to watch a short tutorial on how to use TOBI
Click here to watch a tutorial on how to add Media Overlay using the split and shift feature in TOBI
For those more familiar with the terminal, ReadBeyond Sync has published their code for automatically generating SMIL files and audio here
For a more user friendly approach, a paid tool ($99 per year) to automatically add media overlays is "Pubcoder," but this requires you create your book inside of Pubcoder. You can also just use PubCoder to generate the media overlays (works for both recorded voice files or synthesized voice) and then add them to an existing EPUB.
Click here to watch and example of how to do this.
Publisher is another paid tool to authoring digital talking books. It is available here.
Adding sign language video embed
When creating your accessible EPUB, where possible, include a video recording of sign language in your local language. Ensure the involvement of deaf experts in the recording process. It is advisable to export all sign language videos as *.mp4s and following the sign language recording guidelines.
Ensure compression used to export the video does not reduce the quality so much as to reduce visibility of the sign language interpreter. A good rule of thumb is approximately 960 x 720 size, h.264 with a data rate of 3500 kbps.
In the current EPUB standard, the way to include sign language video is to 'embed' the video file on the page in the ePub. The video file should occupy a consistent area on page to facilitate less confusion for the reader. There is no standard way of synchronizing sign language video with the text on the page, however you can read our process in creating the Learn my Way Reader prototype to see how we developed our synchronized sign language prototype.
Step 9: Packaging your EPUB
After completing the authoring process of your EPUB, if setting up your EPUB as a text package, ensure you package the ePub file following the ePub packaging guidelines. An EPUB is similar to a zip archive containing the files necessary to load the ePub in a compatible screen reader.
Once this is done, your EPUB will be located within a single file (a "portable document") that consists of a Package Document (OPF file) which specifies all of the individual pieces of content that make up the EPUB. The OPF spine and manifest described STEP 6 provide the EPUB with the necessary structure to function.
The end is a single ZIP file containing everything the EPUB needs to function on an eReader or eBook reading software.
Click here to read Matt Garish's guide to packaging an ePub
Step 10: Validating your EPUB
To check that your EPUB conforms to the accessibility requirements set out in the standards, use an EPUB checker to identify issues and correct before distribution. As a first step, opening the EPUB in an accessible reader like Readium and testing will provide you with this initial analysis.
You can also test an EPUB through a program known as a validator or a checker. These programs use internationally approved processes established by the International Digital Book Forum that ensure eBook stores only accept "valid" digital publications.
Click here to access the ePub checker from Daisy
Click here to access the ePub validator from Pagina
Step 11: Testing your EPUB with real users
After authoring and validating your EPUB, test the result using one of the open source reader tools like "Readium" or from a commercial partner like "Vital Source Bookshelf." Testing with real users can teach you about accessibility issues you had not been aware of whilst publishing your book and give you insights on what you might change to appeal to more learners.
Especially important here is test using the target reader software and hardware (tablet/desktop) you intend to distribute your content on. Different reading environments can affect how your ePub is perceived and consumed.
References:
Guides and materials to create an accessible EPUB.
http://idpf.org/a11y
Matt Garrish's introduction to accessible EPUBs.
http://shop.oreilly.com/product/0636920025283.do
eKitabu - toolkit for accessible EPUBs.
http://toolkit.ekitabu.com:8090/td/1-step-by-step-guide-to-create-accessible-epubs
Adobe - Guide to making a basic EPUB in InDesign.
https://helpx.adobe.com/indesign/how-to/indesign-prepare-document-for-epub.html
Accessible EPUB Guide from EPUB Secrets.
http://epubsecrets.com/producing-accessible-ebooks.php